I WILL NEED
- Visual Studio with tools for SSIS installed on my local workspace. I’m using Visual Studio Professional 2019 with the SQL Server Integration Services Project plugin. I have a good understanding of how SSIS works. I know the differences between a SOLUTION. PROJECT, PACKAGE as well as PROJECT VARIABLES and PACKAGE (USER) VARIABLES. I know how to configure CONNECTION MANAGERS.
- SSIS 2016+ Integration Services installed on EACH RDS* server in EACH environment (company location) and/or SSIS installed on at least one EC2 instance in each environment. (*Do not install on RDS instances with a read-only replica. I will treat those as if they were an EC2 instance.) I will be using SQL 2019 Enterprise for the demo here.
- I will need the Proxy credentials that I set up in STEP 2 of this blog.
OVERVIEW
In this example I will create an SQL Server Integration Services (SSIS) Project with a package that will gather our data and output it to a CSV file. This will involve the following steps:
- Creating an SSIS project with variables and data sources.
- Creating an SSIS package within the project, one for EC2 instances and another for RDS instances.
- Creating PowerShell scripts to copy the CSV file to S3.
- Creating a Sql Agent job to run the SSIS package and PowerShell scripts.
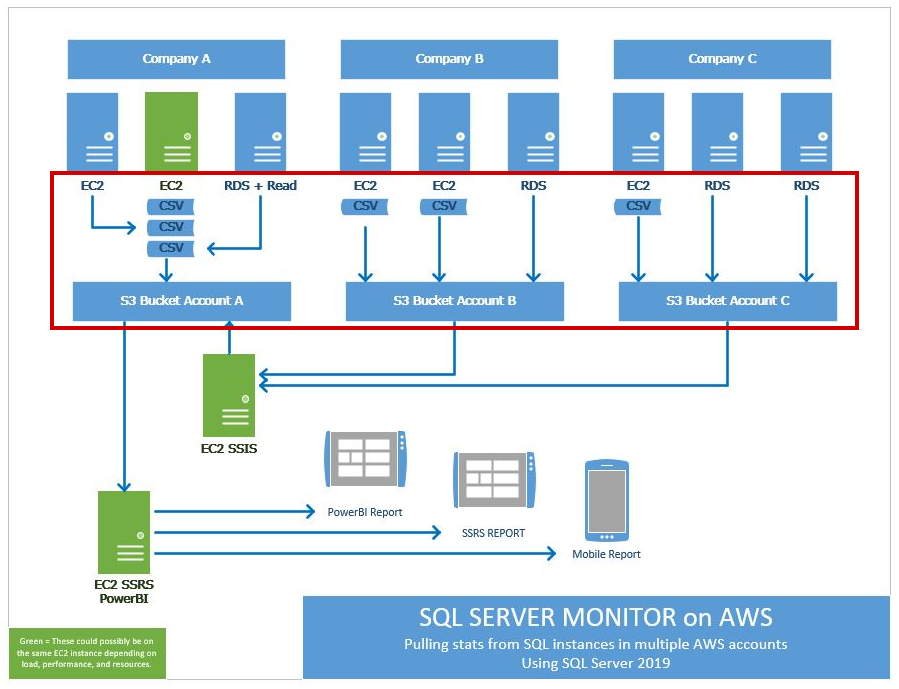
If I were to go back and look at the overview from PART 1, this blog post (Part 6) is the main guts of the operation. I will be grabbing the data from each server, creating a CSV file and storing that in S3. This is a long post so I’m going to try to go slow but not overwhelm with details.
CONSIDERATION
With more than 1 EC2 and 2 RDS instance in a company environment I can simply install the same SSIS package on each instance. Or if I prefer, I could revise my package to create a loop that would change the connection string and hit all the other server instances within my organization. Since the ladder is beyond the scope of this already long post, I will be using the first condition.
SSIS PACKAGE STEPS
Since most of the steps for both the EC2 and RDS versions of the package are the same, I will indicate when something is ONLY for the RDS version.
| SQL installed on EC2 | RDS Server | RDS Server |
|---|---|---|
| SQL installed on EC2 | No read replica, and Uses MS integrated AD | With read replica, or Does not use MS integrated AD |
| Install and use SSIS here. | Install and use SSIS here. | Install and use SSIS on a separate EC2 instance. |
| Follow EC2 instructions and examples below. | Follow RDS instructions and examples below. | Follow EC2 instructions and examples below, but add additional steps for the RDS server data when needed. |
Project Parameters
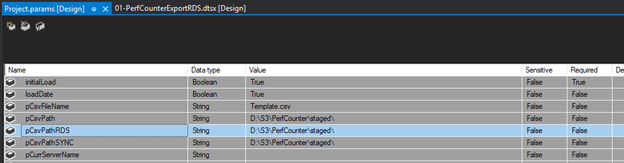
I will need the Project Parameters shown above, plus these:
- pCsvFileName
- pCsvPath
- pCsvPathRDS
- pS3Drop
SSIS Package(s)
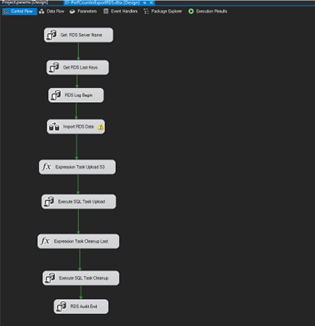
Create a package named PerfCounterExport. I am also creating a package for PerfCounterExportRDS for when the project is running SSIS on RDS.
Hint: Create the first package, then copy and revise as needed for the RDS version.
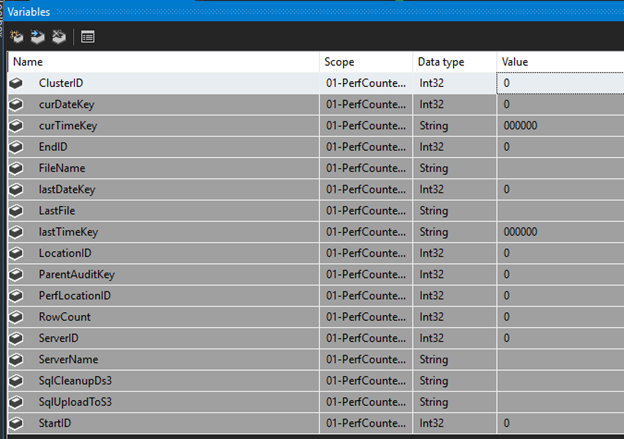
Add these SSIS Variables to the package:
Package Overview
PerfCounterExport
PerfCounterExportRDS
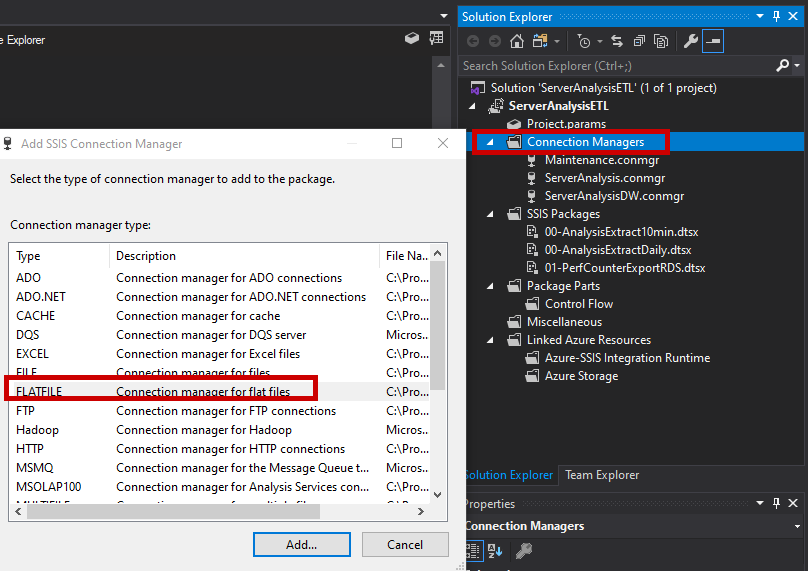
Connection Managers
ADD a FLAT FILE Connection manager by right clicking on CONNECTION MANAGERS in the SOLUTION EXPLORER window, and selecting FLAT FILE.
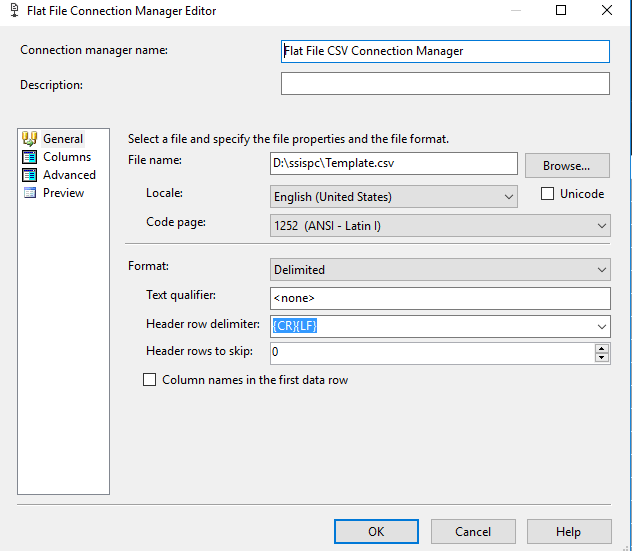
I will configure the settings CONNECTION MANAGER NAME and FILE NAME path in the GENERAL menu tab.
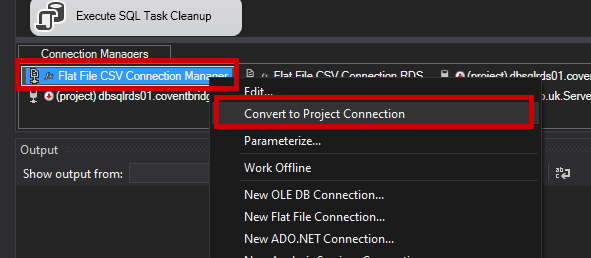
With my PACKAGE OPEN, I right click on the FLAT FILE CONNECTION and select CONVERT TO PROJECT CONNECTION.
Next, I am going to open the PROPERTIES window for the FLAT FILE CONNECTION and enter an EXPRESSION for the CONNECTION STRING.
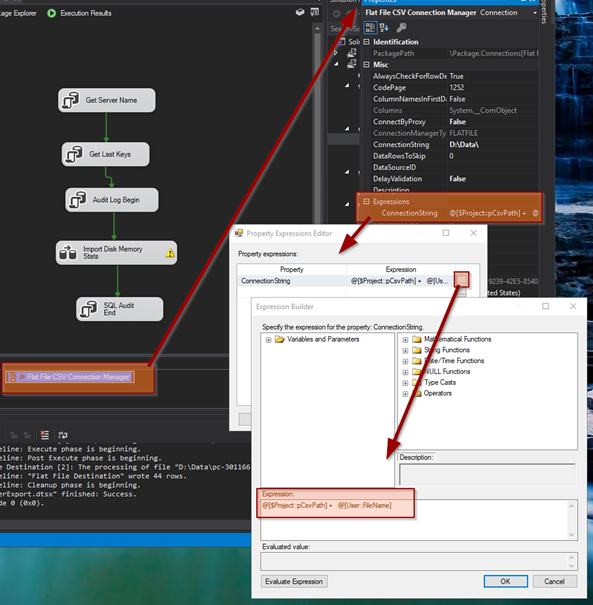
@[$Project::pCsvPath] + @[User::FileName]I will also add a CONNECTION MANAGER to the SERVERANALYSIS database on the same instance where the SSIS package will run.
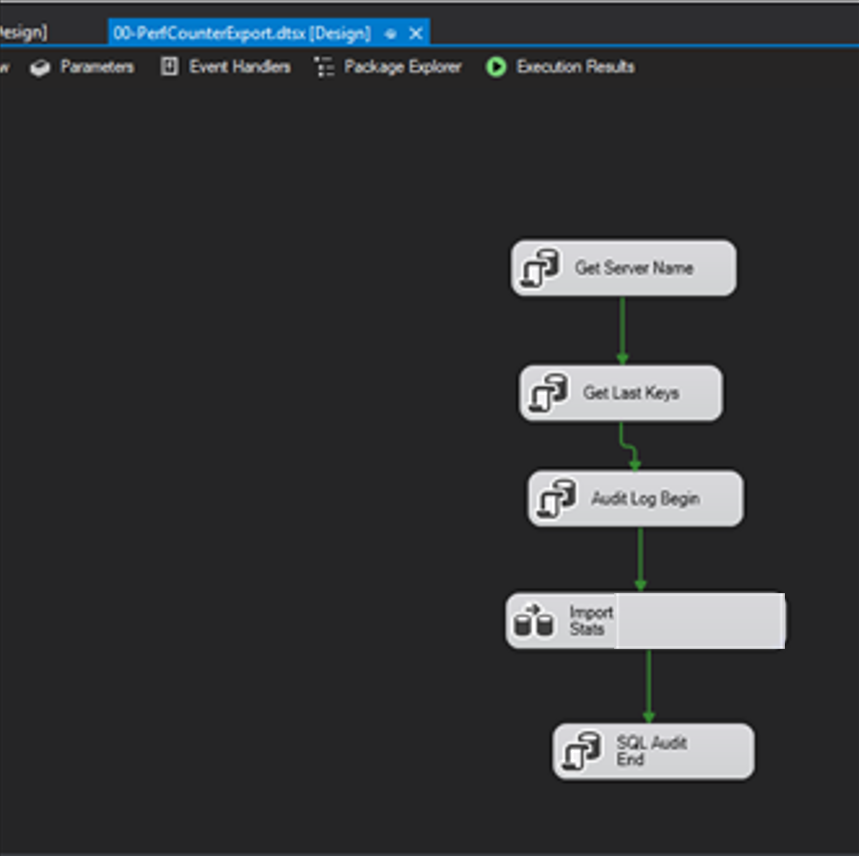
Get Server Name
The first object I add to the package is an EXECUTE SQL TASK. I will call it: GET SERVER NAME. On the GENERAL tab, I will configure it to connect to the ServerAnalysis database connection I created above.
I will then populate some of my USER (package) VARIABLES with the results from this query by switching to the RESULT SET tab.
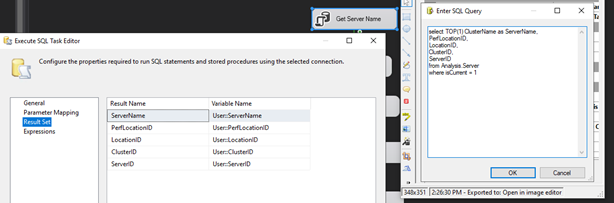
select TOP(1) ClusterName as ServerName,
PerfLocationID,
LocationID,
ClusterID,
ServerID
from Analysis.Server
where isCurrent = 1
Get Last Keys
Next, I will add another EXECUTE SQL TASK and call it: GET LAST KEYS. On the GENERAL tab, I will configure it to connect to the same ServerAnalysis database.
This query will look at my log table and find ID numbers that were previously exported. This way I don’t export the same data I may have already pulled. There are other ways to do this, but I chose limiting the rows here at the source since these files may literally be moving all over the world to get to their destination. This way, if a previous file hasn’t it made it to the DW destination yet, no worries, no conflicts.
SELECT	ISNULL(MAX(DateKey),CONVERT(VARCHAR(10), GETDATE(),112)) As LastDateKey,
	ISNULL(MAX(TimeKey),'000000') As LastTimeKey,
	CONVERT(VARCHAR(10), GETUTCDATE(),112) AS CurDateKey,
	REPLACE(CONVERT(VARCHAR(10), GETUTCDATE(),108),':','') AS CurTimeKey,
	ISNULL(MAX(EndID),0) AS StartID,
	(SELECT	ISNULL(MAX(ID),0) FROM [Analysis].[PerfCounterLog]) AS EndID,
		CONCAT('pc-',
			CONVERT(varchar(12),(SELECT LocationID FROM Analysis.Server where isCurrent=1)),'-',
			CONVERT(varchar(12),(SELECT PerfLocationID FROM Analysis.Server where isCurrent=1)),'-',
			CONVERT(varchar(12),(ISNULL(MAX(DateKey),CONVERT(VARCHAR(10), GETUTCDATE(),112)))),'-',
			CONVERT(varchar(12),(ISNULL(MAX(TimeKey),'000000'))),'-',
			CONVERT(varchar(12),(CONVERT(VARCHAR(10), GETUTCDATE(),112))),'-',
			CONVERT(varchar(12),(REPLACE(CONVERT(VARCHAR(10), GETUTCDATE(),108),':',''))),
			'.csv') AS FileName,
	(select top(1) FileName as LastFile from Analysis.PerfCounterLogActions  order by 1 desc) as LastFile,
	((SELECT ISNULL(MAX(ID),0) FROM [Analysis].[PerfCounterLog]) - ISNULL(MAX(EndID),0) ) AS RowTotal
FROM  [Analysis].[PerfCounterLogActions]
WHERE LogID = (
		SELECT MAX(LogID)
		FROM  [Analysis].[PerfCounterLogActions]
		WHERE StepID = 1 and RunSuccess = 1);
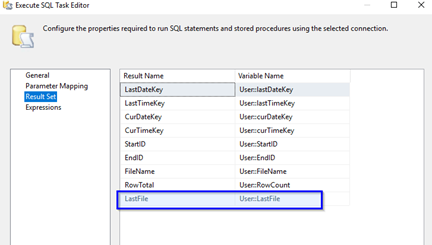
UTC DATE: Notice that I use GETUTCDATE(). My servers are in different countries and time zones and this is the only logical way to keep all the timestamps in sync.
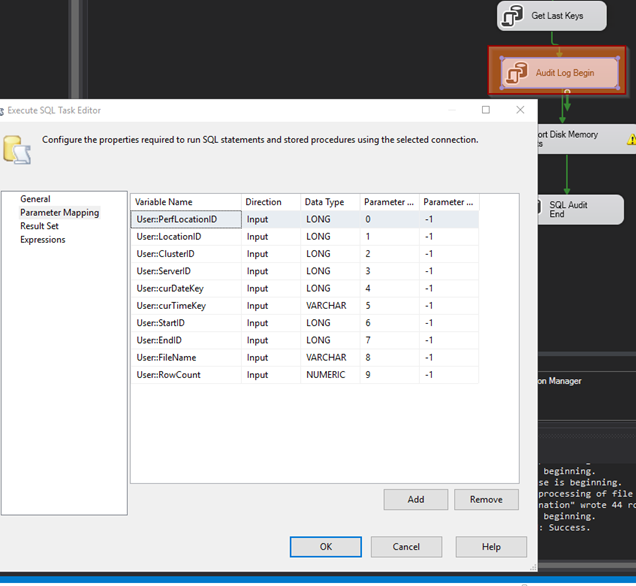
Log Begin
Next, I will add another EXECUTE SQL TASK and call it: (AUDIT or RDS) LOG BEGIN. On the GENERAL tab, I will configure it to connect to the same ServerAnalysis database.
This query will help keep a tab on successful events and failures as I run through the package. It can be very useful in debugging things later on.
INSERT INTO Analysis.PerfCounterLogActions
(ParentLogID,
PerfLocationID,
LocationID,
ClusterID,
ServerID,
DateKey,
TimeKey,
QueryName,
StepID,
StartID,
EndID,
Description,
Action,
FileName,
RunStartUtc,
RunEndUtc,
RunSuccess,
RowsAffected,
ErrorCount,
VerifiedUtc)
VALUES
(NULL,?,?,?,?,?,?,
'PerfCountIncrementalDataGete',
1,?,?,
'SSIS: Pull data for csv file.',
'EXPORTCSV',
?,getdate(), NULL,0,?,0,NULL)
SELECT MAX(LogID) AS ParentID  FROM Analysis.PerfCounterLogActions
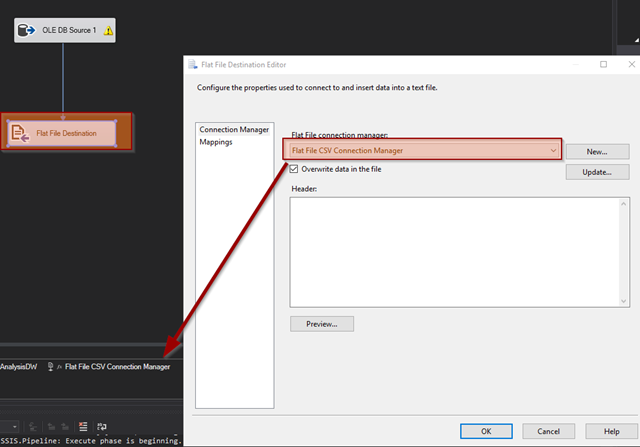
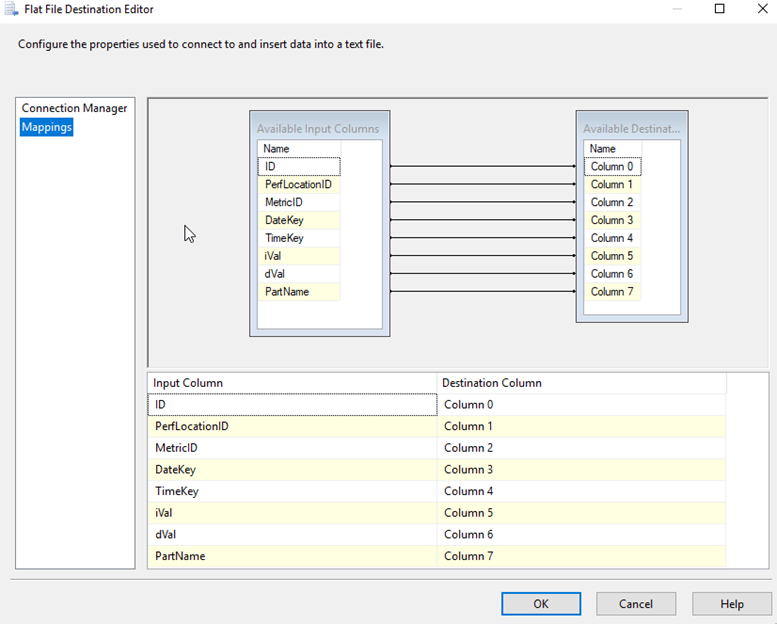
Data Flow Task
I add a DATA FLOW task to the project. Double click on the DATA FLOW object (or click the data flow tab at the top navigation) to access this landscape. I will add two objects. An OLE DB SOURCE and a FLAT FILE DESTINATION.
I will start with the OLE DB SOURCE and make sure it is connected to my database. I want to pull in all that performance data I’ve been capturing.
SELECT TOP (10000) ID, PerfLocationID, MetricID, DateKey, TimeKey, iVal, dVal, REPLACE(PartName,'''','') AS PartName
FROM Analysis.PerfCounterLog
WHERE (ID BETWEEN ? AND ?)
ORDER BY ID DESC

Next, I add the FLAT FILE DESTINATION. Drag the BLUE ARROW from the OLE DB SOURCE down and on top of the FLAT FILE DESTINATION to connect a data flow between the two.
I configure the FLAT FILE CONNECTION MANAGER and then verify the MAPPINGS.
SQL RDS (ONLY) STEPS
The next steps are for RDS Servers (without a read-only replica) that are running SSIS Services. In these next few steps I will move the CSV file from the RDS server to my S3 bucket in the company AWS account. For the EC2 instances, I will do this step later, using PowerShell (see last section of today’s post.)
Add the following two (2) EXPRESSION TASKS and two (2) EXECUTE SQL tasks:
EXPRESSION TASK: UPLOAD S3
@[User::SqlUploadToS3] = "exec msdb.dbo.rds_upload_to_s3 @rds_file_path='" + @[$Project::pCsvPathRDS] + @[User::FileName] + "', @s3_arn_of_file='arn:aws:s3:::" + @[$Project::pS3Drop] + @[User::FileName] + "', @overwrite_file=1"
EXECUTE SQL TASK: UPLOAD

EXPRESSION TASK: CLEAN UP LAST
@[User::SqlCleanupDs3] = "exec msdb.dbo.rds_delete_from_filesystem @rds_file_path='" + @[$Project::pCsvPathRDS] + @[User::LastFile] + "';"
EXECUTE SQL TASK: Clean up

END AUDIT TASK
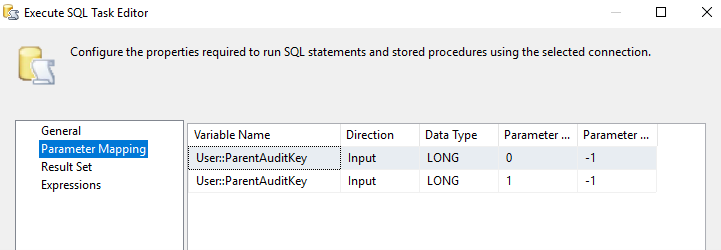
The final EXECUUTE SQL TASK that I add to the project (for both EC2 and RDS) is the END AUDIT TASK. This will update the Audit entry I first created, and mark the package a success.
UPDATE [Analysis].[PerfCounterLogActions]
SET
ParentLogID = ?,
RunEndUtc = GETUTCDATE(),
RunSuccess=1
WHERE LogID = ?
I will use the values stored in my user variables as parameters for this update. SSIS will replace the [?] parameter holders in the above query with these values.
POWER SHELL SCRIPTS (EC2 ONLY)
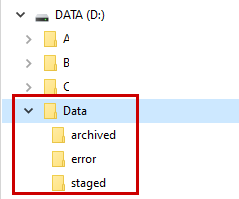
For the EC2 instances (and some RDS instances that have a read-only replica) I will use PowerShell to transfer my CSV files from the local server to AWS S3. On each EC2 instance I have created a directory for the Csv file data as such:
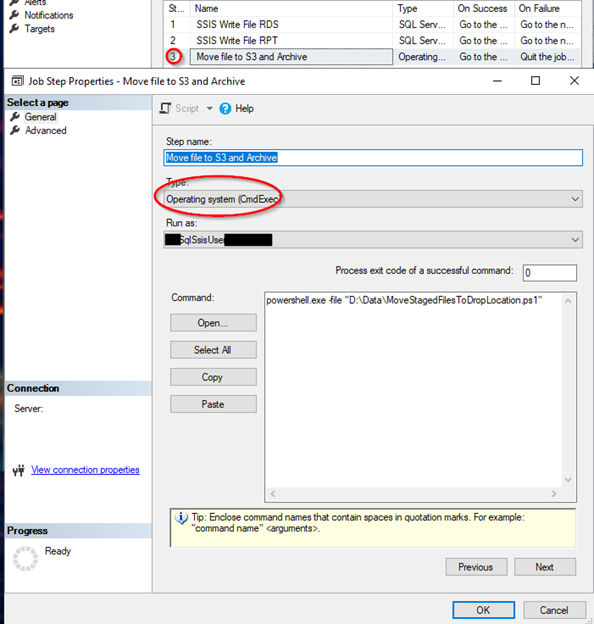
I will create the following script at D:\Data\MoveStagedFilesToDropLocation.ps1 This script will move my csv files from the local machine to AWS S3.
In order for this script to work, I have already (1) created a WINDOWS USER AD ACCOUNT on this (and each) local server for the PROXY ACCOUNT I set up previously. And (2) I have configured the AWS CLI CREDENTIALS for this account on each local server. Since we already set up the permissions on the S3 bucket (in a previous step) for this PROXY user, there should not be any access issues.
SECURITY NOTE: As mentioned previously, it is very important that this PROXY account has the VERY MINIMAL ACCESS required. It should ONLY have read/write permissions on the D:\Data folder and on the AWS S3 bucket created specifically for these files.
# These lines may be needed if task is run from SQL Agent Job.
$env:Path += ';C:\Program Files\Amazon\AWSCLIV2\'
$env:USERPROFILE = "c:\users\$env:USERNAME"

# Specify a limit time so that new files that arrive in mid process are not archived or deleted.
$limit = (Get-Date)
$path = "D:\Data\staged\"
$bucket = "s3://MyCOMPANY-database/ssis/PerfCounter/FileDrop/"
$DestinationPath = "D:\Data\archived\"

# Copy Files to Archive
Set-Location -Path $path
Get-ChildItem -Path $path -Recurse -Force |  Where-Object { $_.CreationTime -lt $limit } |  Copy-Item -Destination $DestinationPath

# Copy files to S3
aws s3 cp $path $bucket --recursive

# Delete file
Set-Location -Path $path
Get-ChildItem -Path $path -Recurse -Force -File | Where-Object { $_.CreationTime -lt $limit } | ForEach-Object { Remove-Item -Path $_.FullName -Force }
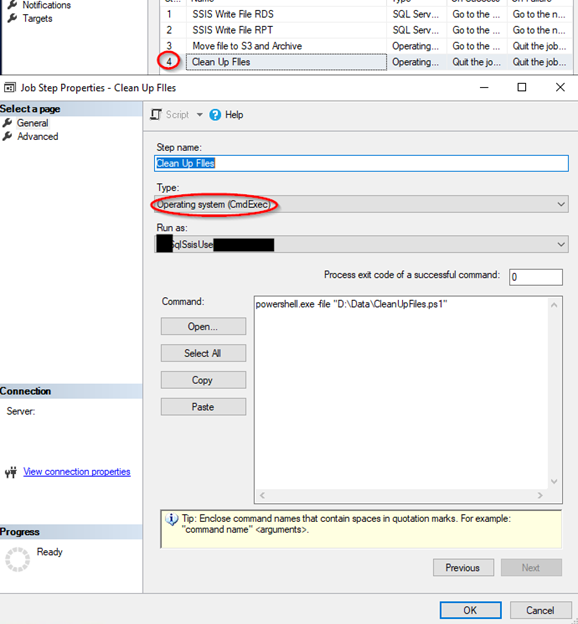
I will create the following script at D:\Data\CleanUpFiles.ps1 This will delete all CSV files that are 18 days and older.
# Specify a limit time so that new files that arrive in mid process are not archived or deleted.
$limit = (Get-Date)
$path = "D:\Data\archived\"

# Will delete all files in SUB Folders too
Get-ChildItem -Path $path -Recurse -Force -File | Where-Object { $_.LastWriteTime -lt ((Get-Date).AddDays(-18)) } | ForEach-Object { Remove-Item -Path $_.FullName -Force }


$path = "D:\Data\error\"

# Will delete all files in SUB Folders too
Get-ChildItem -Path $path -Recurse -Force -File | Where-Object { $_.LastWriteTime -lt ((Get-Date).AddDays(-18)) } | ForEach-Object { Remove-Item -Path $_.FullName -Force }
WHY DO I NEED POWERSHELL?
Here is a closer look at where my CSV files currently reside at this point in the process and then how I will get it to company headquarters for the monitor.
| EC2 Server Track | RDS Server Track | |
| Right Now (SSIS) | My CSV file is on local disk | My CSV file is in the company S3 bucket |
| This Step (PowerShell) | Files will copy from local disk up to company S3 bucket. | n/a |
| Next Step (Blog Part 7) | Company S3 files are copied to Headquarter S3 bucket. | Company S3 files are copied to Headquarter S3 bucket. |
SQL AGENT JOB TIMING
Depending on the level of stale data my monitor can live with, I will select a time to pull and move the data. This FIRST SSIS PACKAGE (here in Step 6) is what I call the LOCAL DATA PULL. I can set my Agent Job to run anywhere from 1 minute to an hour or more if I like. The more often the data is pulled, the more stress that is put on my systems. Less often means less stress but also means the data will be more stale.
In this chart I created I can see how my LOCAL DATA PULL plus the DATA WAREHOUSE pickup time (I’ll create that in Step 7) combined will affect how recent/stale the data is in the monitor. This chart would apply to the DATA METRICS that we created in the last step that run every 60, 120, or 180 seconds.
| Local Interval Local Csv / DW Pickup-> | 5 minutes | 10 minutes | 15 minutes | 30 minutes | 60 minutes |
| 5 minutes | 10 – 15 | 15 – 20* | 20 – 35 | 35 – 65 | 65 – 125 |
| 10 minutes | 15 – 20 | 20 – 30 | 25 – 45 | 40 – 70 | 70 – 130 |
| 15 minutes | 20 – 35 | 25 – 45 | 30 – 45 | 45 – 75 | 75 – 135 |
| 30 minutes | 35 – 65 | 40 – 70 | 45 – 75 | 60 -90 | 90 – 150 |
| 60 minutes | 65 – 125 | 70 – 130 | 75 – 135 | 90 – 150 | 120 -180 |
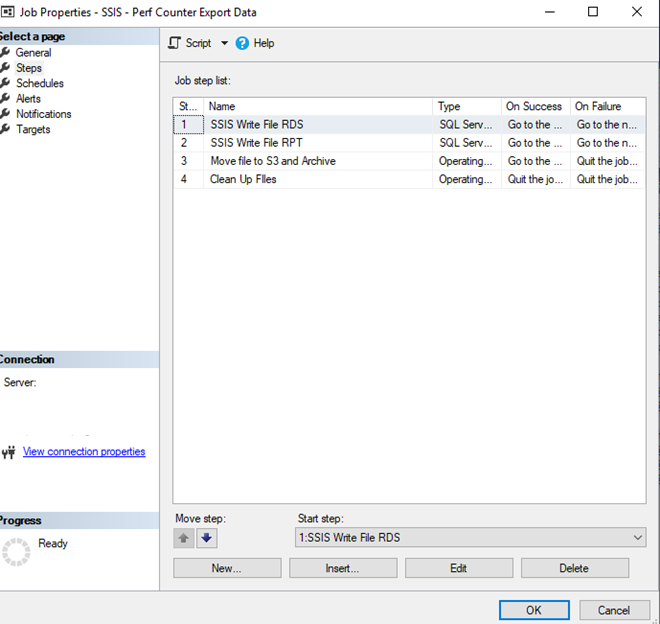
SQL AGENT JOB SET UP
There are four steps for the SQL Agent job. Not all steps will be needed on all server instances. Here is how I determine which steps I need.
| JOB STEP | ECS Instance RDS Instance, read-only replica (Single or Multi-AZ) | RDS Instance, no read-only replica (Single or Multi-AZ) |
| SSIS Write File RDS | NO | YES |
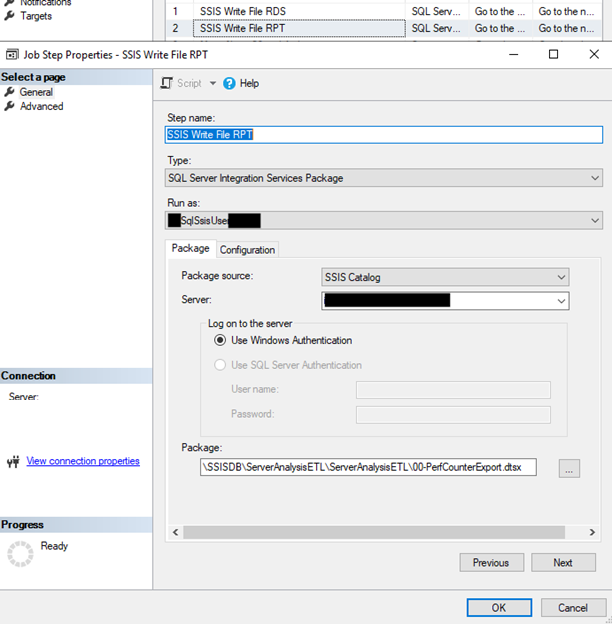
| SSIS Write FIle RPT | YES | NO |
| Move file to S3 and Archive | YES | NO |
| Cleanup Files | YES | NO |
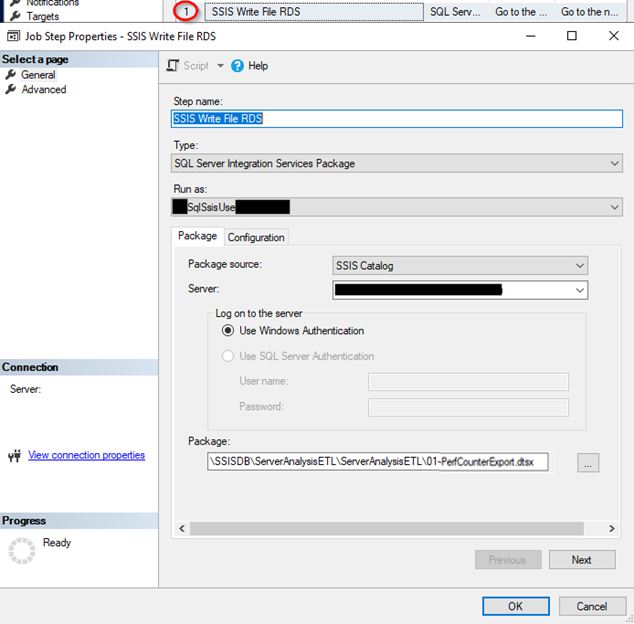
SSIS WRITE FILE RDS – Configuration example
SSIS WRITE FILE EC2 – Configuration Example
EC2 POWERSHELL COPY FILE TO S3 STEP – Configuration Example
EC2 POWERSHELL CLEANUP STEP – Configuration Example
To complete the job, I will set up a schedule. I typically run my production and critical servers at a five (5) minute interval and development and staging servers at ten (10) minutes.
IN THE NEXT PART (7): I will go into how to create the SSIS package and POWERSHELL SCRIPT that will bring all the data together into one data warehouse database.